Nexus Sound System/Documentation
Nexus Sound System Documentation
This documentation is to better help you with the product to help you efficiently work with the product and make use of all of it's features properly. Having trouble using a feature? Consult the documentation below.
Need help navigating this manual better? Please use the table of contents to the right of this page.
Before we get started on using the Sound System, we would like to thank you on choosing us! If you have any questions please ask in our Second Life Group.
If your questions are not answered, please file a ticket here on our Support Site.
⚠This is a very complicated system, it may take a bit to understand. Just because you run into a problem with nothing working, does not mean the product does not work, you may just have the wrong cable plugging into something.
Please contact support or use our in-world group for help!
What's is the box?
Before we go ahead and start setting things up, let's get a better understand of what's inside the box! There are multiple parts that are required and some that are optional and make a system better.
Disk Storage Server
The disk storage server is used to store disks within a single spot. It's a server that gets placed on the server rack or touring cart. It's operation is extremely simple, placing a CD inside is as simple as rezzing the CD, touching the CD, and touching the server. After that, it's in!
To get the CDs out of the server, click and hold down on the server. After that; a menu will pop up will all the CDs you have inside the server. Once you found the CD you want, just click it on the menu, and it will get ejected out.
Sound Speakers
The speakers are the most important part! Without them, you will obviously not be able play any sound. To set up your speakers, you will need to start by positioning them!
If you are looking to use the soundboard with the speaker, then you will need to configure the speaker for the soundboard. To do this, go into the "_config" notecard in the speakers inventory.
Disc Processor
The Disc Processor will take a CD in and shoot sound on its output cable. The operation of this device is extremely simple, just rez, rig, insert CD, and it works. It is easily rigged with a Sequencer to keep all processors that are linked together, in a line / playlist. It also has extra features in the configuration note-card in the inventory.
Have a disc inside that's not coming out? Touch and hold until the Processor says, "Ejecting Disc".
Snake Splitter
This item is used to take multiple inputs, and split it through the various outputs(speakers). It is also used by the soundboard as a way to control everything. The soundboard will only connect to the snake splitter to control everything via the Network Cable.
Sequencer
The Sequencer is used by the Disc Processors to play them one after the other. It can be controlled by the soundboard with the Sequencer control panel. The Sequencer takes 4 inputs from the Processors and comes with 2 outputs. It also has extra features in the configuration note-card in the inventory. Perfect for playing songs in order.
Sound Board
The best piece of the puzzle is the Sound Board. The sound board is fully changeable and customizable. All parts can be removed and placed. There are currently 4 modules that can be placed, 3 functioning and 1 Decoration module.
To place a module onto the Soundboard, position your sound board and rez out the item Soundboard Modules. Once the box is rezzed, simply click it and select your module that you would like to place by clicking on one of the blank panels on the sound board. If your module does not attach, make sure that the soundboard's network cable is connected to a Snake Splitter.
If you want to remove a module, you will need to wear the screwdriver and click on the module. This will remove it from the sound board and place the panel back on.
Different Modules
Sound Output Module
The sound output module controls the volumes and levels of the speaker. All sliders work, as well as the buttons Mute and Solo.
If your speakers are not changing in volume, then you need to make sure that the speaker is labeled for that slider.
Equalizer Module
This panel is just for decoration at the moment, we couldn't find a use for it since it's impossible to manipulate sounds...
Sequencer Module
This module controls the Sequencers that are connected to a Snake Splitter. There are multiple buttons on the Sequencer.
- Resync : This will resync all your speakers when they are not perfectly synced and playing sounds at the same time.
- Stop : This will stop the active song that's playing. This will not rewind the song.
- Play : This will continue playing the song.
- Fast Forward / Next : This will move onto the next song in the Sequencer's list.
- Rewind / Back : If the button is clicked once, then it will rewind the current song. Double clicked, then it will go back in the sequencer's list.
- Preload : This will preload the song that is currently selected by the Sequencer.
Midi Module
This module allows for random sounds to be played on the speakers.
To load in a sound, simply look for the blue button "Program", touch, and enter the sound's UUID. This will load the sound into one of the buttons, when that button is clicked, any speakers wired up with the soundboard will play that sound.
To reset all the sounds and clear them, simply hit the red button "Reset"
Setting Up
There are multiple ways to wire up the system, with the endless combinations, it's important to make sure that you keep track of how things are wired.
To wire up speakers, you will need to go into your inventory, and select the Cable tool.
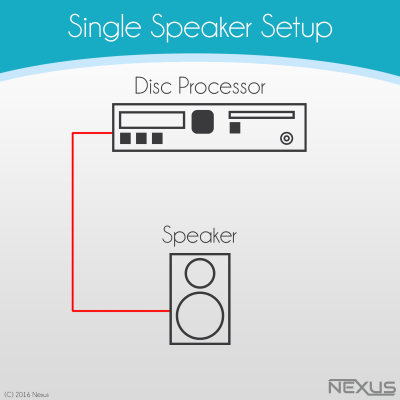
Simple Single Speaker Set up
This set up is used for a single speaker, it's the simplest to do.
Once this set up has been wired, you can simply click the Disc Processor and it will start playing the music!
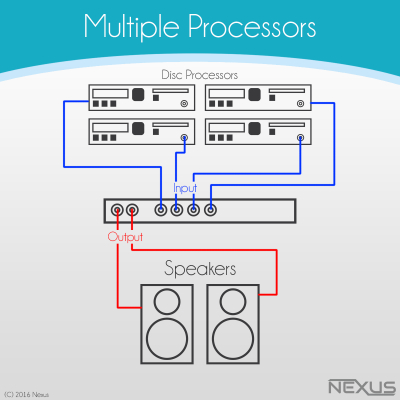
Multiple Processors
This setup will allow for multiple processors (4 Max) to be hooked into one sequencer. The the Sequencer will output the songs on 2 Speakers.
Once this is set-up, then you will simply be able to click the first Processor, let it run, and everything will run as normal. If you set the Sequencer to loop, then it will continue to play the list over and over. This is perfect for malls, restaurants, and stores.
Concert Set Up
This set up is the most complex and can be easily expanded, please be warned, the more speakers you have the more out of sync they will be. It is recommended to have at least 1 splitter with 16 outputted speakers. This setup will take a while to rig, so be prepared!
Creating Mixtapes
Before creating CDs for the Sound System, you will need to download Audacity. This is a simple program used for Editing and Publishing sounds. It is very common use for Second Life sound editing.
Before you continue, make sure that you select your song!
Splitting Up Songs
Once you have gotten the song of your choice, it's time to split up the song! The easiest way to split up the song is to use Audacity's Labels and divide them for every 9.5 seconds.
To create labels at intervals, navigate too Analyze and select Regular Label Intervals.
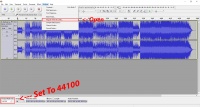
Once you have done that, we must now specify how often we want to place the label.
Since the boom box outputs a song every 9.5 seconds and Second Life's sound limit is 10 seconds.
We will create an interval of 9.5.
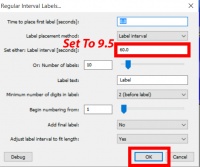
Now that you have split up the song, it's time to export!
Navigate too File and Export Multiple.
Don't forget to set your project Bitrate at 44100Hz at the bottom.
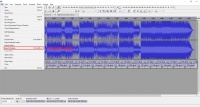
We're almost there, we just need to export the sounds that are between every label.
We will go ahead and add a number for every label when exporting.
This will make it easier for when you upload into Second Life.

Congratulations, you now have the sound all split up and ready for upload!
Uploading To Second Life
Well, we have the sounds all exported and split up. Now we just need to upload into Second Life.
The easiest way to upload into Second Life, is to Upload Multiple Files at once. Navigate to Avatar in the viewer window. Then Find Upload -> Bulk (Multi-File) Upload. Once done, navigate to the folder where you saved all your sounds and select them all using Shift+Click.
Creating The CD
We're almost done! Last thing to do is create that Cassette Tape. Look in your inventory and rez out the Nexus Disc - Blank
Navigate to it's inventory, and select the notecard _song. Inside the note-card, you will notice three things. [TITLE], [ARTIST], [SONG]'. Each of these help format your Cassette.
Under [TITLE], you will need to enter the title of your song. For example, we will enter in Hot Mixtape Under [ARTIST], we will go ahead and put our name in it sense we created that song. Shymus Roffo
Now you have gotten to the interesting part. Each UUID from the sounds you uploaded must be placed on a new line. Make sure that they are placed in correct order. If you exported the way from Audacity using the labels, it should have created numbers next to each sound you uploaded. You will need to paste the UUID of that sound from one to however many sounds you have.
Below is an example of a Cassette Tape. This tape is shorted as an example.
[TITLE]
Mall Music

[ARTIST]
Shymus Roffo

[SONG]
cbc1546c-8408-5304-3cef-f08bb2714d03
ebbc4918-c20d-6f7b-9098-4d8d3d0ef01e
524b7f8a-4485-a514-d8fb-7650e02153f0
aa4ab0fe-7bd3-eedb-4dcc-f6a847d0193d
0c85ac7b-d40d-1cff-5ac6-948a80675ea5
5676050d-06c3-2c41-0231-eb7df6ec5e28
9a6e69cb-a2cd-10b1-1e29-cf52be8056e8
Preparing For Distribution
Now that you have everything set up, you will need to set the proper permissions on your mix tape to prevent someone from stealing it. Due to copyright issues, we require that users not be able to use the tape without these permissions set. The Cassette Tapes will not work until the correct permissions are set.
The permissions required by the _song notecard are ( No Mod / Copy / No Transfer ) The permissions required by the _disc script are ( No Mod / Copy / No Transfer )
Once this is complete, feel free to check and make sure that everything the way you want it, and feel free to give to your friends or maybe share with others in the Nexus Group. Have a great day and happy Tape Mixing!
