Nexus Boom Box/Documentation
Nexus Boom Box Documentation
This documentation is to better help you with the product to help you efficiently work with the product and make use of all of it's features properly. Having trouble using a feature? Consult the documentation below.
Need help navigating this manual better? Please use the table of contents to the right of this page.
Before we get started on using the Boom Box, we would like to thank you on choosing us! If you have any questions please ask in our Second Life Group. If your questions are not answered, please file a ticket here on our Support Site.
The Boom Box
Operating the boom box is extremely simple. All you have to do is rez the Boom Box to the ground!
Playing Songs
To play a song, you will first need to find a song cassette from your inventory. These cassettes must be compatible with the boom box. We do supply you with songs, however you can make your own song tapes.
Once you have rezzed a tape next to the boom box. Simply click the tape, and bam! The box will take over and do the rest.
Once a song is placed into the boom box, it will need to preload the song. This can take about 10-20 seconds depending on the song size. If the song is not preloaded, then the song will not play correctly and will be nothing but a bunch of skipping around.
Your songs will sometimes skip due to in world viewers not being able to load sounds fast enough. Your song will not be 100% perfect. Please do not contact us informing us that your song is skipping unless the skipping is extremely massive. If we did not create the Cassette tape, please contact the person who sent you the tape before contacting us.
Creating Mixtapes
Before creating for the Boom Box, you will need to download Audacity. This is a simple program used for Editing and Publishing sounds. It is very common use for Second Life sound editing.
Before you continue, make sure that you select your song!
Splitting Up Songs
Once you have gotten the song of your choice, it's time to split up the song! The easiest way to split up the song is to use Audacity's Labels and divide them for every 9.5 seconds.
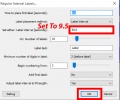
To create labels at intervals, navigate too Analyze and select Regular Label Intervals.
Once you have done that, we must now specify how often we want to place the label. Since the boom box outputs a song every 9.5 seconds and Second Life's sound limit is 10 seconds. We will create an interval of 9.5.
Now that you have split up the song, it's time to export! Navigate too File and Export Multiple. Don't forget to set your project Bitrate at 44100Hz at the bottom.
We're almost there, we just need to export the sounds that are between every label. We will go ahead and add a number for every label when exporting. This will make it easier for when you upload into Second Life.
Congratulations, you now have the sound all split up and ready for upload!
Uploading To Second Life
Well, we have the sounds all exported and split up. Now we just need to upload into Second Life.
The easiest way to upload into Second Life, is to Upload Multiple Files at once. Navigate to Avatar in the viewer window. Then Find Upload -> Bulk (Multi-File) Upload. Once done, navigate to the folder where you saved all your sounds and select them all using Shift+Click.
Creating The Cassette Tape
We're almost done! Last thing to do is create that Cassette Tape. Look in your inventory and rez out the Nexus Cassette Tape - Blank
Navigate to it's inventory, and select the notecard _song. Inside the notecard, you will notice three things. [TITLE], [ARTIST], [SONG]'. Each of these help format your Cassette.
Under [TITLE], you will need to enter the title of your song. For example, we will enter in Hot Mixtape Under [ARTIST], we will go ahead and put our name in it sense we created that song. Shymus Roffo
Now you have gotten to the interesting part. Each UUID from the sounds you uploaded must be placed on a new line. Make sure that they are placed in correct order. If you exported the way from Audacity using the labels, it should have created numbers next to each sound you uploaded. You will need to paste the UUID of that sound from one to however many sounds you have.
Below is an example of a Cassette Tape. This tape is shorted as an example.
[TITLE]
Mall Music

[ARTIST]
Shymus Roffo

[SONG]
cbc1546c-8408-5304-3cef-f08bb2714d03
ebbc4918-c20d-6f7b-9098-4d8d3d0ef01e
524b7f8a-4485-a514-d8fb-7650e02153f0
aa4ab0fe-7bd3-eedb-4dcc-f6a847d0193d
0c85ac7b-d40d-1cff-5ac6-948a80675ea5
5676050d-06c3-2c41-0231-eb7df6ec5e28
9a6e69cb-a2cd-10b1-1e29-cf52be8056e8
Preparing For Distribution
Now that you have everything set up, you will need to set the proper permissions on your mix tape to prevent someone from stealing it. Due to copyright issues, we require that users not be able to use the tape without these permissions set. The Cassette Tapes will not work until the correct permissions are set.
The permissions required by the _song notecard are ( No Mod / Copy / No Transfer ) The permissions required by the _cassette script are ( No Mod / Copy / No Transfer )
Once this is complete, feel free to check and make sure that everything the way you want it, and feel free to give to your friends or maybe share with others in the Nexus Group. Have a great day and happy Tape Mixing!


